What is the Payoneer company?
Payoneer is a money transferring solution for online marketers, bloggers, freelancers, content writers, affiliate marketers, and online tutors to receive and send their earned money. Payoneer is the best way to get payment from the international 200 countries. Payoneer was founded in 2005 by Yuval Tal who was born in Israel. Its headquarter is situated in New York (US) and 1400 employees are working recently in the Payoneer company. It serves approximately 4 million customers in 14 offices amongst 200 countries.
How does Payoneer work?
When you create an account with Payoneer, they will give you a virtual account in which all your earned money will be stored. From that, you will be able to send money to another account easily. Since many bloggers and affiliate marketers work with different online companies who earn a lot of money in revenue. Here Payoneer is one of the best ways to get that money with the least fees.
The list of 200+ countries that support Payoneer:
If you are one of the countries that I list below, You are a lucky one. Because Payoneer is my best and recommended way to use in online working. Considering some of the conditions Payoneer only works only in the given more than two hundred countries. Payoneer is ready to refer their giant services for the bloggers in quite 200+ countries. You are allowed to send and receive payments from any online companies without any hassle. If you are out of these countries you can use to get benefits from its alternative ways.
Payoneer supported countries list
Country Name Currency Name
| ALBANIA | Albanian Lek |
| ALGERIA | Algerian Dinar |
| AMERICAN SAMOA | United States Dollar |
| ANDORRA | Euro |
| ANGOLA | Angolan Kwanza |
| ANGUILLA | Eastern Caribbean dollar |
| ANTIGUA AND BARBUDA | Eastern Caribbean dollar |
| ARGENTINA | Argentine peso, Argentine austral |
| ARMENIA | Armenian Dram |
| ARUBA | Aruban florin |
| AUSTRALIA | Australian dollar |
| AUSTRIA | Euro |
| AZERBAIJAN | Azerbaijani manat |
| AZORES | Euro |
| BAHAMAS | Bahamian dollar |
| BAHRAIN | Bahraini dinar |
| BANGLADESH | Bangladeshi taka |
| BARBADOS | Barbadian dollar |
| BELARUS | Belarusian ruble |
| BELGIUM | Euro |
| BELIZE | Belize dollar |
| BENIN | West African CFA franc |
| BHUTAN | Indian rupee, Bhutanese ngultrum |
| BOLIVIA | Bolivian boliviano |
| BOSNIA AND HERZEGOVINA | Bosnia and Herzegovina convertible mark |
| BOTSWANA | Botswana pula |
| BRAZIL | Brazilian real |
| BRITISH VIRGIN ISLANDS | United States Dollar |
| BRUNEI DARUSSALAM | Brunei dollar |
| BULGARIA | Bulgarian lev |
| BURKINA FASO | West African CFA franc |
| BURUNDI | |
| CAMBODIA | Cambodian riel |
| CAMEROON | Central African CFA franc |
| CANADA | Canadian dollar |
| CANARY ISLANDS | Euro |
| CAPE VERDE | Cape Verdean escudo |
| CAYMAN ISLANDS | Cayman Islands dollar |
| CENTRAL AFRICAN REPUBLIC | Central African CFA franc |
| CHAD | Central African CFA franc |
| CHILE | Chilean peso |
| CHINA | Renminbi |
| COLOMBIA | Colombian peso |
| COMOROS | Comorian franc |
| CONGO | Congolese franc, Zairean zaire |
| COOK ISLANDS | New Zealand dollar, Cook Islands dollar |
| COSTA RICA | Costa Rican colón |
| COTE D’IVOIRE | West African CFA franc |
| CROATIA | Croatian kuna |
| CYPRUS | Euro, Cypriot pound |
| CZECH REPUBLIC | Czech koruna |
| DENMARK | Danish krone |
| DJIBOUTI | Djiboutian franc |
| DOMINICA | Eastern Caribbean dollar |
| DOMINICAN REPUBLIC | Dominican peso |
| EAST TIMOR | United States Dollar |
| ECUADOR | United States Dollar |
| EGYPT | Egyptian pound |
| EL SALVADOR | United States Dollar |
| EQUATORIAL GUINEA | Central African CFA franc |
| ERITREA | Eritrean nakfa |
| ESTONIA | Euro |
| ETHIOPIA | Ethiopian birr |
| FALKLAND ISLANDS (MALVINAS) | Falkland Islands pound |
| FAROE ISLANDS | Faroese, Danish |
| FEDERATED STATES OF MICRONESIA | United States Dollar |
| FIJI | Fijian dollar |
| FINLAND | Euro |
| FRANCE | Euro, CFP franc |
| FRENCH GUIANA | euro |
| FRENCH POLYNESIA | CFP franc |
| GABON | Central African CFA franc |
| GEORGIA | Georgian lari |
| GERMANY | Euro |
| GHANA | Ghanaian cedi |
| GIBRALTAR | Pound sterling, Gibraltar pound |
| GREECE | Euro |
| GREENLAND | Danish krone |
| GRENADA | Eastern Caribbean dollar |
| GUAM | United States Dollar |
| GUATEMALA | Guatemalan quetzal |
| GUERNSEY | Pound sterling, Guernsey pound |
| GUINEA | Guinean franc |
| GUINEA-BISSAU | West African CFA franc |
| GUYANA | Guyanese dollar |
| HAITI | Haitian gourde |
| HONDURAS | Honduran lempira |
| HONG KONG | Hong Kong Dollar (HKD) |
| HUNGARY | Hungarian forint |
| ICELAND | Icelandic króna |
| INDIA | Indian rupee |
| INDONESIA | Indonesian Rupiah (IDR) |
| IRELAND | Euro |
| ISLE OF MAN | Manx pound, Pound Sterling |
| ISRAEL | Israeli new shekel |
| ITALY | Euro |
| JAMAICA | Jamaican dollar |
| JAPAN | Japanese yen |
| JERSEY | Pound sterling, Jersey pound |
| JORDAN | Jordanian dinar |
| KAZAKHSTAN | Kazakhstani tenge |
| KENYA | Kenyan shilling |
| KIRIBATI | Australian dollar, Kiribati dollar |
| KUWAIT | Kuwaiti dinar |
| KYRGYZSTAN | Kyrgyzstani som |
| LAO PEOPLE’S DEMOCRATIC REPUBLIC | Lao kip |
| LATVIA | Euro |
| LEBANON | Lebanese pound |
| LESOTHO | Lesotho loti |
| LIBERIA | Liberian dollar |
| LIECHTENSTEIN | Swiss franc |
| LITHUANIA | Euro |
| LUXEMBOURG | Euro |
| MACAU | Macanese pataca |
| MACEDONIA | Macedonian denar |
| MADAGASCAR | Malagasy ariary |
| MALAWI | Malawian kwacha |
| MALDIVES | Maldivian rufiyaa |
| MALI | West African CFA franc |
| MALTA | Euro |
| MARTINIQUE | Euro |
| MAURITANIA | Mauritanian ouguiya |
| MAURITIUS | Mauritian rupee |
| MAYOTTE | Euro |
| MEXICO | Mexican peso |
| MOLDOVA | Moldovan Leu |
| MONACO | Euro |
| MONGOLIA | Mongolian tögrög |
| MONTENEGRO | Euro, Euro sign |
| MONTSERRAT | Eastern Caribbean dollar |
| MOROCCO | Moroccan dirham |
| MOZAMBIQUE | Metical |
| NAMIBIA | Namibian dollar, South African Rand |
| NEPAL | Nepalese rupee |
| NETHERLANDS | Euro |
| NETHERLANDS ANTILLES | Dutch guilder, Netherlands Antillean guilder |
| NEW CALEDONIA | CFP franc |
| NEW ZEALAND | New Zealand dollar |
| NICARAGUA | Nicaraguan córdoba |
| NIGER | West African CFA franc |
| NIGERIA | Nigerian naira |
| NORTHERN MARIANA ISLANDS | United States Dollar |
| NORWAY | Norwegian krone |
| OMAN | Omani rial |
| PAKISTAN | Pakistani rupee |
| PANAMA | United States Dollar, Panamanian balboa |
| PAPUA NEW GUINEA | Papua New Guinean kina |
| PARAGUAY | Paraguayan guaraní |
| PERU | Sol |
| PHILIPPINES | Philippine peso |
| POLAND | Polish złoty |
| PORTUGAL | Euro |
| PUERTO RICO | United States Dollar |
| QATAR | Qatari riyal |
| REUNION | Euro |
| ROMANIA | Romanian leu |
| RUSSIAN FEDERATION | Russian Rouble (RUB) |
| RWANDA | Rwandan franc |
| SAINT KITTS AND NEVIS | Eastern Caribbean dollar |
| SAINT LUCIA | Eastern Caribbean dollar |
| SAINT PIERRE AND MIQUELON | Euro |
| SAINT VINCENT AND THE GRENADINES | Eastern Caribbean dollar |
| SAMOA | Samoan tālā |
| SAN MARINO | Euro |
| SAO TOME AND PRINCIPE | São Tomé and Príncipe dobra |
| SAUDI ARABIA | Saudi Riyal |
| SENEGAL | West African CFA franc |
| SERBIA | Serbian dinar |
| SEYCHELLES | Seychellois rupee |
| SIERRA LEONE | Sierra Leonean leone |
| SINGAPORE | Singaporean Dollar |
| SLOVAKIA | Euro, Euro sign |
| SLOVENIA | Euro |
| SOLOMON ISLANDS | Solomon Islands dollar |
| SOMALIA | Somali shilling |
| SOUTH AFRICA | South African Rand |
| SOUTH KOREA | South Korean won |
| SPAIN | Euro |
| SRI LANKA | Sri Lankan rupee |
| SURINAME | Surinamese dollar |
| SWAZILAND | Swazi lilangeni, South African rand |
| SWEDEN | Swedish krona |
| SWITZERLAND | Swiss franc |
| TAIWAN | New Taiwan dollar |
| TAJIKISTAN | Tajikistani somoni |
| TANZANIA | Tanzanian shilling |
| THAILAND | Thai baht |
| THE GAMBIA | Gambian dalasi |
| TOGO | CFA franc |
| TONGA | Tongan paʻanga |
| TRINIDAD AND TOBAGO | Trinidad and Tobago dollar |
| TUNISIA | Tunisian dinar |
| TURKEY | Turkish lira |
| TURKMENISTAN | Turkmenistan manat |
| TURKS AND CAICOS ISLANDS | United States Dollar |
| TUVALU | Australian dollar, Tuvaluan dollar |
| UGANDA | Ugandan shilling |
| UKRAINE | Ukrainian hryvnia |
| UNITED ARAB EMIRATES | United Arab Emirates dirham |
| UNITED KINGDOM | Pound sterling |
| UNITED STATES | United States dollar |
| URUGUAY | Uruguayan peso |
| UZBEKISTAN | Uzbekistani soʻm |
| VANUATU | Vanuatu vatu |
| VATICAN | Euro |
| VENEZUELA | Venezuelan bolívar |
| VIETNAM | Vietnamese dong |
| VIRGIN ISLANDS (U.S.) | United States Dollar |
| YEMEN | Yemeni rial |
| ZAMBIA | Zambian kwacha |
| ZIMBABWE | United States Dollar, South African rand, Euro, Renminbi, Indian rupee, Pound sterling, Botswana Pula |
How To Create Payoneer Account?
Making a Payoneer account is the right decision for you because I haven't ever seen any other best and fast online money transferring solution. For avoiding any issue during creating a Payoneer account, just look a moment to the following steps. This is not a long process to sign up for the Payoneer account but you should take care of the few steps.
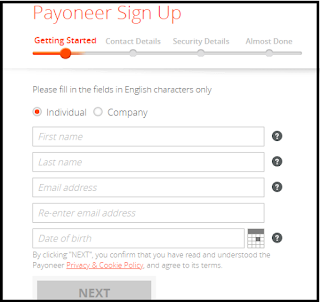
Step 1:. Getting Started
- What type of work do you do? i.e you work individually or you are an employee in a company.
- Along the way, you have to enter first name, last name, email address,
- Enter your date of birth, which is written on your CNIC. Without taking a look at your CNIC, you might enter the wrong date of birth. So make sure to enter the right date of birth.
- After following this step, you have completed your first step. Now hit the next button to move you in the next step.
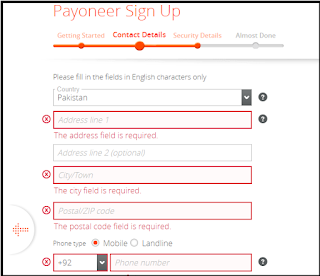
Step 2:. Contact Details
- You have to enter the name of the country in which you are currently living.
- Then enter your residential address including the full street name and number.
- Enter your city/town name.
- Provide your Postal/ZIP code. This is the code given to your post office specifically. Click here if you want to know your post office ZIP code.
- Which one are you using? mobile or landline.
- Enter the mobile number you are currently using. As of now, I hope you might have provided the right information to the Payoneer team. Press the next button for improving to the next step.
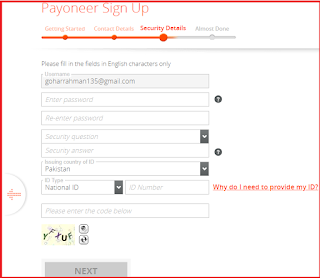
Step 3:.Security Details:
- As you see a Gmail Id, given already in the first step.
- write your password. For better security, you should enter the password consisting of the English alphabets(a-z) and numerical digit (0-9).
- To confirm your password, reenter your password.
- Security question: Whenever you verify your account, you may be asked to enter this security question. Also, it may be asked while you reset your account password. Here many questions have been listed. you may pick up the question of your choice and give the answer. You should remember the answer to that question for the future to help you.
- Enter your country name.
- You are given the three choices for entering your national identification. i.e you can enter CNIC, Driving license, or Passport No. You may be asked only to enter the CNIC no while you choose National ID. If you select a Driving license then you should also enter the expiry date of your license. Furthermore, if you select Passport, you have to enter the issue and expiry date both of your Passport.
- Enter the given captcha. Upper and lower case matters.
Step 4: Almost Done
- You have to choose which type of account are you using. Personal account or company account.
- Here you should select the country your bank is situated in.
- Choose the currency of your country.
- Select your bank name from the given list.
- Now write your account name. Since you might have created a bank account on your name. i.e you should enter your name.
- Enter your IBAN (International Bank Account Number). This number is given on your bank card and is consists of 24 characters.
- Just mark the two statements in the last (privacy and policy, terms and conditions, etc).
Congratulation Announcement
Now you have created your Payoneer account and the Payoneer team will verify your information in a few days. Once they confirm your information, they will send an email to you. So I hope you found this post helpful. Because I tried my best to make it simple and easy. But still, if you get any hassle after reading this article while you create the Payoneer account. Then make sure to contact us to solve your problem.


![How to Create Table in Blogger? [2020 Guide]](https://blogger.googleusercontent.com/img/b/R29vZ2xl/AVvXsEjgNlKdi559ggQJyBsoEToYk78-ow3fQi50WybEo6Bz-2H5_8Yqnd23c3IJ9PLv2qeaj0l0ihsofHP8eHgnXM3xRi0RlOH8P602BNMWnQxaCmkrP8mw5MpBZZj0XBYC7412Ps0-I60UIn5v/w100/Screenshot+%25283%2529.png)

0 Comments